Although the manual keratometer has served eye doctors well for over 150 years, the advent of corneal topography has revolutionized our ability to discern corneal shape characteristics, as topographers have largely replaced the keratometer as the essential component in the contact lens fitting process. Allowing practitioners to see beyond the 3mm limit of the keratometer, a corneal topographer also gives us the ability to analyze the cornea in three dimensions when assessing shape characteristics.
Especially now that the technology is equipped to provide more information about the cornea than just the central curvature readings, we must consider how best to use these maps to benefit our contact lens practice. For example, proper analysis of the map can help us select a more accurate initial lens, determine lens type and assist in making the proper adjustments to the lens fit.
This article will cover the different types of corneal topography maps and how to use this information to fit corneal rigid gas permeable (GP) and scleral lenses.
 | |
| Fig. 1. Poor image capture from a patient with ocular surface disease. | |
| Fig. 2. Scheimpflug image from Pentacam. |
Types of Topography
There are two methods of recording corneal topography: reflection-based and projection-based. Reflection-based topography—the most widely used—is further divided into raster photogrammetry and placido-based topography. Raster photogrammetry reads curvature by taking multiple triangulated measurements using a projector and two cameras. Currently, this relatively new technology is being used to measure scleral curvature for scleral lens fitting. Placido-based topographers, in contrast, use multiple concentric rings reflected off the corneal surface to analyze corneal curvature using slope; the height of the cornea is extrapolated from these measurements. This method is dependent on the quality of the reflection, so images are sometimes difficult to capture if the cornea is badly distorted, as in the case of advanced ocular surface disease (Figure 1).1
Projection- or elevation-based topography measures the anterior and posterior corneal surface by both reflection and light projection through the cornea. The Orbscan (Technolas) uses optical slit-scan imaging and the Pentacam (Oculus) uses rotating Scheimpflug imaging to acquire data (Figure 2). Projection-based topography measures height and specific points on the cornea. From height, the slope and radius of curvature is measured, making these measurements more precise than reflection-based topography. In addition, projection-based topography does not rely on the quality of the reflection from the cornea and can read badly distorted corneal surfaces.1
Types of Topography Maps
• Axial Map. This displays the rate of local curvature change of the anterior surface, based on the placido image. Curvature measurements are made between the placido rings. Light is assumed to be refracted from the corneal surface, using the optical center as the reference points; as such, the map is more sensitive to changes in central curvature versus in the periphery.2 Axial maps are particularly useful for determining the meridian, regularity and amount of astigmatism.
• Elevation Map. The most valuable map for corneal GP fitting, the elevation map appears most similar to the contact lens fluorescein pattern. In this display, different elevations on the cornea are measured from an average reference point. Areas higher than the reference will appear red and yellow, while the lower areas will appear green or blue. It is important to combine data from both the axial map and elevation map while fitting contact lenses.
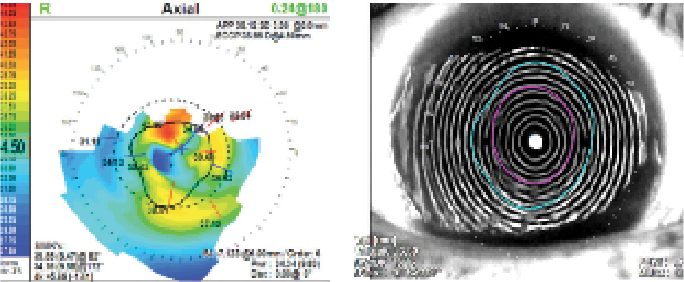
| Fig. 3. Comparison of axial and tangential maps on a post-refractive patient. Readings of center curvature are the same but vary greatly in the periphery. | |
| Fig. 4. A keratoconus patient showing a posterior elevation of 104µm and GP corrected BVA of 20/30. Notice the focal elevation of the central cone on the elevation map vs. the broad area of steepening on the axial map. The tangential map will show the most accurate size and curvature of the cone. |
While the axial map will demonstrate the curvature of the eye, the elevation map will provide more detailed information with regards to the unique shape of the cornea—the steepest point of the cornea is not necessarily the most elevated.
• Tangential or Instantaneous Map. This is the most sensitive map for determining changes in curvature in the peripheral region of the cornea. These maps include peripheral curvature in the calculations for scaled curvature and don’t use a central reference point.2 It is particularly useful when fitting corneas that have curvature changes in the periphery, as in post-refractive surgery patients (Figure 3).2 Tangential maps can also help determine the exact shape and size of the cone in keratoconus.3
Projection-Based Maps
• Anterior Float. After calculating a best-fit sphere for the anterior corneal surface, the anterior float demonstrates elevation above and below this hypothetical plane, with warm colors present above the sphere and cool colors present below it. This map is useful in assessing the regularity of astigmatism and areas of asymmetry, and is similar to the axial map.3
• Posterior Float. A display of the elevation above and below a best-fit sphere for the posterior cornea surface is used here similarly as in the anterior float. Acquiring a map of the posterior surface has become the gold standard in ruling out the presence of forme fruste keratoconus in patients during LASIK consultations.3 Changes in the patient’s epithelial basement membrane and Bowman’s layer are the first histological changes in keratoconus.4 Traditionally, only the anterior surface of the cornea is evaluated when fitting a contact lens; as such, any irregularity of the posterior cornea is assumed to remain uncorrected by placement of a contact lens on the anterior surface, thus affecting the patient’s final visual acuity (Figure 4). Posterior elevation topographic maps may be able to provide practitioners with better target visual acuity for contact lens fitting. Within the visual axis, for patients with a posterior elevation between 70µm and 100µm, a practitioner should expect no better than 20/30 acuity; between 130µm and 140µm, no better than 20/40 acuity; and greater than >200µm, no better than 20/70 acuity.
GP Fitting
The primary goal of GP fitting is to respect the shape of the cornea as much as possible without inflicting damage or changes on the ocular surface. In the case of a normal cornea, it is not always necessary to use corneal topography to design lenses; however, peripheral corneal data can be valuable in determining what type of lens to choose for your patients. This data is especially important if the practitioner decides to fit a larger diameter.
| Fig. 5. Indices: eccentricity, pupil diameter, horizontal visible iris diameter. | |
| Fig. 6. Topography over multifocal GP showing line of sight centered on the right (fit on K) and decentered up on the left (Fit flat). |
Corneas with a higher rate of flattening may benefit from aspheric designs. The term eccentricity value (E value) describes the rate of flattening in the cornea (Figure 5). Normal corneas exhibit an E value of approximately 0.55.5 Higher than average E values indicate a prolate cornea that flattens at a more rapid rate, such as in keratoconus.
Corneal alignment of the GP lens in the midperiphery can be managed by increasing or decreasing the E value of the GP according to the E value on the topography.6 In normal corneas, contact lenses with normal eccentricity values can decenter on patients with higher than average E values. In an irregular cornea, such as in a keratoconus patient, the midperiphery is usually significantly flatter than the apex. Increasing the E value in both cases will assist in the alignment of the lens without sacrificing the alignment of the central fit.6
When fitting a toric cornea, an axial topography map can be used to visualize the nature of the astigmatism (i.e., how regular or irregular it is and how far it extends throughout the cornea). This information can help the practitioner make decisions about diameter and the peripheral fit of the lens.
In multifocal lens fitting, new theories in multifocal design have emphasized the importance of the centration of multifocal optics in order for the fit to be successful. The topographer can be used to obtain an objective measurement of pupillary size to assist in optic zone design (Figure 5). Topography can also be used to check multifocal optics alignment through the patient’s line of sight while the patient is wearing the lens (Figure 6).7
Some topographers come equipped with software programs that can assist virtually with contact lens fitting. Brand name lenses as well as generic lens parameters are preloaded into these programs for the practitioner to choose from. These programs allow the practitioner to select a lens and will simulate the fluorescein pattern of the lens using the patient’s corneal map. The practitioner can then adjust the lens parameters and see the changes in the fluorescein pattern.8
Keratoconus
In keratoconus, the key to lens selection is to determine the size, shape and location of the cone. To do this, again, compare the axial, tangential and elevation maps. The axial map will show the overall shape and curvature of the eye, while the elevation map will show the shape of the cone.
Tangential maps can help the practitioner measure the size and shape of the cone, which can be helpful in determining overall diameter as well as optic zone size (Figure 4). Tangential maps may also provide more accurate curvature information about the periphery of the cornea to aid the practitioner in designing peripheral curves for the patient.
Small diameter lenses are best for the nipple form of keratoconus—in which the cone is located centrally, steeply curved and typically less than 5mm in diameter—while large diameter lenses are preferable for decentered cones, which are displaced from the apical center into the inferior quadrant. Large diameter lenses are also best for oval cones, which typically measure more than 5mm in diameter and are characterized by a broad area of elevation in the inferior cornea, as they provide forced centration over the pupil. Reverse geometry lenses can also be helpful for centration with a secondary curve steeper than the central base curve to accommodate the decentered cone without excessive central vault.
| Fig. 7. A patient with PMD. The tangential map shows steepening inferior to what is displayed in the axial map. Photo: Christine W. Sindt, OD | |
| Fig. 8. Comparison of theoretical Medmont software fluorescein pattern compared to real diagnostic lens. Photo: Christine W. Sindt, OD |
Pellucid marginal degeneration (PMD) is typically characterized by the presence of a “kissing doves” pattern on the axial map (Figure 7), which represents the thinning that occurs 1mm to 2mm away from the limbus. Once a diagnosis of PMD is confirmed, the elevation map should be referenced to find the location and elevation of the cone.
Traditional keratoconic lenses do not fit patients with PMD; instead, these patients should be fit with large diameter reverse geometry lenses or scleral lenses to accommodate the steepness in the mid periphery.1 Once the diameter and lens design is determined, the next step is to select the base curve. There are many opinions on the best way to choose the initial lens for your patient, from selecting the lens based on the yellow curvature on the axial map to fitting 0.2 flatter to average K reading and selecting the reference sphere from the elevation map. The best suggestion is to follow the method of the fitting guide of the lens that is being used.1
Post-Graft Fitting
There are many factors to consider when choosing the right type of lens for a patient who has undergone corneal grafting. The physiologic needs of the donor cornea must be respected, reducing mechanical and hypoxic stress to the cornea and the risk of neovascularization and rejection. Generally, contact lenses don’t cause graft rejection; however complications from contact lens wear can.10,11 Gas permeable lenses in general offer the best visual correction, and corneal GPs specifically have the best oxygen transmission. Corneal GPs should be considered first with fitting post graft patients.10 Approximately 20% of patients who undergo PKP still have irregular astigmatism and benefit from GP correction.12
When selecting an initial diagnostic lens, compare the axial and elevation maps to determine the shape of the graft. Larger diameter GP lenses (i.e., 10.5mm to 12mm) are best suited to cover the graft/host junction of most grafts, while keratoconic designs fit optimally over prolate grafts (31% of grafts), which are steeper in the center and flatter in the periphery. Oblate or plateau-shaped corneas (31% of grafts) typically benefit best in a reverse geometry design that is flatter in the center with a steeper secondary curve (Figure 9). In the case of a mixed prolate/oblate cornea with symmetrical astigmatism (18% of grafts), use the axial map to determine how regular the astigmatism is and how far it extends throughout the graft.
| Fig. 9. Oblate graft. | |
| Fig. 10. Graft with regular astigmatism. |
Bitoric or back surface toric designs are best suited for corneas with symmetrical astigmatism, as they distribute the weight of the lens as evenly as possible (Figure 10). This lens can be fit much like a traditional bitoric, using the axial map curvature readings to align the flat base curve to the flat meridian. Add only two-thirds of the total toricity to the steep meridian—it is safer to add less toricity than is believed necessary to encourage lens rock and tear exchange.13 A bitoric lens that is too tight can result in mechanical trauma to the graft.
Grafts with asymmetrical astigmatism account for 9% of grafts. These corneas are most successful in large diameter spherical lenses, which mask the irregular astigmatism. Thirteen percent of grafts are tilted (i.e., transitioning from steep to flat). Tilted grafts are considered by many practitioners to be the most difficult to fit, and often require a large diameter GP lens or scleral lens.12
Scleral Lenses
Similar to keratoconic lens designs, each scleral lens fitting set will recommend its own method of choosing an initial diagnostic lens. Practitioners may be directed either to begin by selecting the middle lens in the set or using the patient’s sagittal height, horizontal visible iris diameter or a trial-and-error method to find the right lens. Since these lenses are fit predominantly based on sagittal height, keratometric readings don’t typically provide enough information to tell us which lens would fit the patient best; instead, these readings give information on the pathology and general shape of the cornea to help us determine if we need to fit the lens flat (for post-refractive cornea) or steep (for keratoconus). However, topography systems do offer more information about other aspects of the corneal surface that can help practitioners make a decision. This includes:
| Fig. 11. Image from the sMap3D from Visionary Optics. | |
| Fig. 12. Steep, prolate graft. |
• Elevation Map. This indicates the most elevated area of the cornea, which is crucial to know when selecting a lens to fit. If the elevation is decentered, a reverse geometry scleral lens allows for vault in the midperiphery without too much central clearance.
• HVID. Horizontal visible iris diameter is an important measurement because it is necessary for the scleral lens to clear the limbus and land outside the corneal/scleral junction. Knowing the HVID measurement of the patient’s eye will help you select the right diameter for your patient.14
• Sagittal Height. The most accurate method of selecting an initial scleral lens, sagittal height is the measurement from the center of the cornea to the intersection of a specific chord length. Most topographers give the sagittal depth of the patient’s cornea to a chord length of 10mm. If fitting a 15mm lens, 2,000µm—the average sagittal height for most eye types from a chord length of 10mm to 15mm—will need to be added.12 Another 350µm should also be included to account for necessary corneal clearance. Sagittal height will also need to increase when increasing the lens diameter; roughly 300µm per millimeter of lens diameter change is considered ideal.14
• Fitting the Periphery. New technology from a few different companies has given us the ability to map the scleral contour, making it easier to fit patients with toric scleras. Visionary Optics has a unique design that maps scleral curvature to better align the peripheral fit of its Europa lenses. The sMap3D system (Precision Ocular Metrology) incorporates raster photogrammetry, which takes multiple, triangulated measurements using a projector and two cameras to determine corneal and scleral measurements. Fluorescence is used to image the bulbar conjunctiva. Images are taken while the patient is looking straight ahead, up and down; these three images are then pieced together to create a three-dimensional model of the eye, sent to the laboratory and used to assist in the manufacturing of the lens.14
In conclusion, a proper assessment and comparison of the various topographical maps will enable practitioners to streamline contact lens fitting. Some say contact lens fitting is more of an art form than a science. With that said, I don’t believe technology will ever fully replace the judgment of a skilled practitioner; however, if used properly, topographers can assist in reducing chair time, increasing patient success and keeping costs down.
Dr. Shibayama recently completed a one-year specialty contact lens fellowship at the Jules Stein Eye Institute following graduation from the Pennsylvania College of Optometry, before taking over the specialty lens practice from her mentor, Barry Weissman, OD. Her practice consists of 80% specialty fits, including keratoconus, post-corneal transplants, scars, dry eyes, post-refractive ectasia and infantile aphakia.
2. Szczotka-Flynn L, Jani BR. Comparison of axial and tangential topographic algorithms for contact lens fitting after LASIK. Eye Contact Lens. 2005 Nov;31(6):257-62.
3. Sutphin J, Dana R, Florakis G, et al. Basic and Clinical Science Course, Section 08: External Disease and Cornea. San Francisco: American Academy of Ophthalmology. 2006-2007:39-48.
4. Barbara A. Textbook on Keratoconus: New Insights. New Delhi: Jaypee Highlights Medical Publishers. 2012:50-51.
5. Hansen D. Evaluating the eye with corneal topography. Contact Lens Spectrum. August 2003.
6. Indovina K, Potter R. Eccentricity changes in GP lens design. Contact Lens Spectrum. April 2008.
7. Brujic M, Miller J. Repurposing the office topographer. Review of Cornea and Contact Lens. June 2012.
8. Eiden B, DeNayer G, Brafman S, et al. Using advanced technologies for contact lens fitting. Contact Lens Spectrum. August 2012.
9. Sindt C. Evaluating virtual fitting for keratoconus. Contact Lens Spectrum. May 2011.
10. Kaufman H, Barron B, McDonald M. The Cornea, 2nd Ed. Butterworth-Heinemann 1998.
11. Geerards AJ, Vreugdenhil W. Khazen A. Incidence of rigid gas-permeable contact lens wear after keratoplasty for keratoconus. Eye Contact Lens. 2006 Jul;32(4):207-10.
12.Hom M, Bruce A. Contact Lens Prescribing and Fitting. 3rd ed. Philadelphia: Butterworth, Heinemann, Elsevier. 2006.
13. Phan VA, Kim YH, Yang C, Weissman BA. Bitoric rigid gas permeable contact lenses in the optical management of penetrating keratoplasty. Contact Lens Anterior Eye. 2014 Feb;37(1):16-9.
14. Jedlicka J, Denaeyer G. Critical measurements to improve scleral lens fitting. Review of Cornea and Contact Lenses. September 2015.