 |  |
Not only have scleral lenses altered the landscape of custom and specialty lenses, they have begun to compete with mainstream contact lens options. Not long ago, we would fit scleral lenses only for the worst of the worst keratoconus or transplant patients. Now, we are reaching for scleral lenses on a daily basis. The benefits and features scleral lenses can bring to both the patient and the practice are phenomenal and well worth exploring.
But like most things, scleral lenses have a range. The basics of scleral lenses can be taught in a few hours and can get a fitter up and running with the lenses on some of their easier patients. The more advanced fitting techniques can be explored in endless detail, and we are always learning new things from the fits and patients we encounter on a daily basis.
This beginner blueprint can help you get started fitting scleral lenses in your practice.
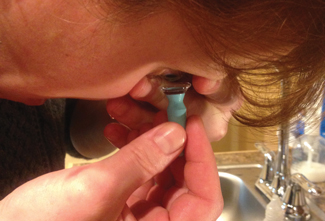 |
| Fig. 1. A large plunger is a helpful tool to insert scleral lenses. |
What You Need
The first step in integrating scleral lenses into your practice is gathering the tools of the trade before ordering a fitting set or a lens for a patient. Although every contact lens fitter has their own preferences when it comes to the tools they use, most would agree this basic list includes the essentials:
- Small plunger for removal of lenses.
- Large plunger for insertion of lenses (Figure 1).
- Non-preserved saline solution to fill the bowl of the lens for insertion.
- Sodium fluorescein inserted in the bowl of the lens to help visualize fit.
- Slit lamp.
- OCT with anterior segment abilities (optional, but useful).
Fitting Set
Scleral lenses cannot be ordered empirically and must be fit using a diagnostic lens. Because they are fit with vault over the cornea and land on the sclera, we need to see a lens on the eye; our modern measurement capabilities are still too variable to ensure a proper fit with measurements alone. Future technologies may soon address this.
| Supporting Actor |
| A laboratory’s job is to make you more successful—they are your partner. If the lab overcomplicates things or does not give you the support you need, it is time to find a new laboratory. Make sure that they support you as you start this new adventure with scleral lenses. |
A good place to start is the fitting set provided by your gas permeable laboratory. You can also ask colleagues about the fitting set they use; if you choose to use the same fitting set as a colleague, you will have the same language if you need advice. First-time fitters would do well to choose a fitting set that is simple, has great education in video form, has plenty of support from people who have fit the lens.
Some lens types come with 36 to 50 lenses in their fitting set. Although this may allow you to fit a few more patients than a fitting set with only eight lenses, it may be too daunting at first. We personally use a fitting set that has 12 lenses. For us, a more simplified approach speeds up the fitting process.
Video education is ideal for clinicians looking to learn and enhance their fitting. Pictures rarely provide the perspective that you see with your slit lamp and dynamic movements. Look for guides that include training videos that will help to increase your confidence—you will also want videos that allow you to refer back to them after you have fit the lens a couple of times.
Initial Hurdles
Starting to fit scleral lenses can seem intimidating, especially if you have never done it in a workshop setting; however, a plethora of online education can guide you.
Before seeing any patients, you need to practice. You can place lenses on your own eyes and other team members’ eyes. Do lens evaluations on them with your slit lamp and role-play the fitting process. Then, remove the lenses. You should have plenty of experience with inserting and removing the lenses before you see your first patient.
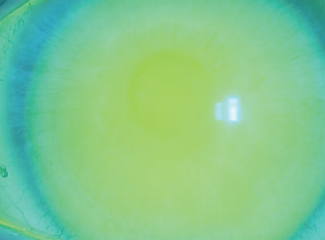 |
| Fig. 2. This scleral lens shows limbal bearing, which should be avoided. |
Your team should train with you in the care and handling of lenses, as well as insertion and removal. While you should do the training on the first two to three patients, you can have a team member join you so they can learn alongside of you.
Getting the Office Ready For Sclerals
If you are the first in your office to fit scleral lenses, it is important to prepare your team. Everyone needs to know what scleral lenses are, how they work, why they are fit on some patients instead of other lens modalities, why they are so expensive and how to bill for them, to name only a few key educational needs. Team members will also need to be prepared for the added patient education and questions such as what patients can expect from wearing them, initially and long-term, and what the aftercare is going to look like. We suggest creating a how-to manual for your team’s reference.
When billing for these specialty lenses, you must call a patient’s insurance company ahead of time, or look into whether they have coverage so that you are able to estimate the patient’s out-of-pocket costs.
Fitting Basics
Generally speaking, we feel that the vast majority of scleral lens fittings follow these three principles:
- Vault over the central cornea (100μm to 300μm).
- Clear the limbal transition area.
- Land the lens as tangentially as possible on the conjunctiva/sclera.
Scleral lenses are intended to vault over the central cornea, but not too much and not too little. If there is too much clearance, the cornea may not get the oxygen it needs; if the lens does not have enough vault, it may land directly on the cornea.
Becoming proficient with these three principles takes time. Your laboratory can help you troubleshoot issues that arise during fitting. Take pictures and video whenever you can to show the lab.
| Fitting Pearls |
|