 |
If you are new to scleral contact lens fittings and own an optical coherence tomography (OCT) device, you have an amazing tool at your fingertips that can help make your job significantly easier. OCT has long been used to assess the posterior segment of the eye and has more recently gained popularity for anterior segment uses as well.
Global pachymetry features have given us the ability to measure the thickness of the cornea, which is great for monitoring the progression of diseases like keratoconus and pellucid marginal degeneration. Additionally, the “angle” feature allows us to view the iris configuration and angle measurement in degrees, helping us determine if a patient may be at greater risk for narrow angle glaucoma. Now, OCT can also assist with specialty contact lens fittings.
| Is OCT Billable for Scleral lens Fitting? |
Augmenting the Slit Lamp
When fitting scleral contact lenses, it is of utmost importance to obtain proper corneal and limbal clearance. This can be assessed with a slit lamp and sodium fluorescein by comparing lens thickness to the tear layer thickness. If you only have access to a slit lamp, this is a completely acceptable method of fitting scleral lenses—but what if you could compare your slit lamp findings with your OCT scans? This could lead to better overall assessment of scleral lenses and is a great way to improve confidence (for both you and the patient) when fitting scleral lenses.
It is advisable to first insert the scleral lens and immediately evaluate it with the slit lamp. If the amount of clearance looks acceptable, let the lens settle for at least 20 to 30 minutes before reevaluation. Keep in mind the central clearance will decrease around 100µm during this time. Then, use the anterior segment feature of your OCT to measure the amount of central, limbal and edge clearance. You can do this either before or after your reevaluation of the lens under the slit lamp.
 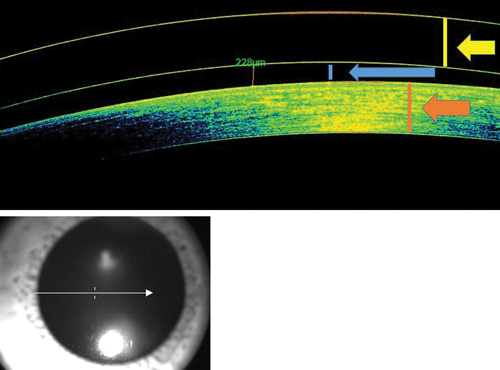 | |
| Fig. 1. OCT measurement of central lens clearance. |
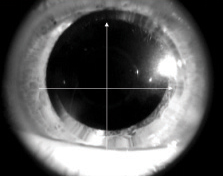
First, check the amount of central clearance by centering the OCT image over the pupil (Figure 1). Then, use the ruler application to measure from the posterior portion of the scleral lens to the anterior portion of the cornea to determine the amount of central clearance in microns. You can then compare your findings with the slit lamp to see how accurate you are.
If you know which area of the cornea has the highest elevation, you can also center the OCT image over that portion of the lens and measure the amount of clearance in that location. To check limbal clearance, center the OCT image over the limbus. Clearance here should be significantly less than central clearance in most scleral lens designs.
Edge alignment can also be viewed using an OCT. Have the patient look to the left and the right to capture images of the edge of the scleral lens (Figure 2). You can also check the alignment of the conjunctiva with the scleral lens edge to see if there is any compression. OCT imaging can also be useful when fitting hybrid lenses—you can view both the soft skirt and GP lens junction, as well as the lens-to-cornea fitting relationship (Figure 3).
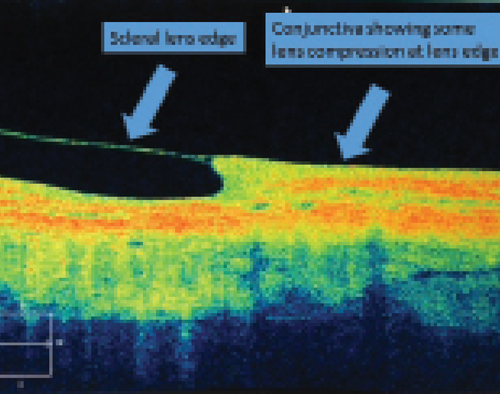 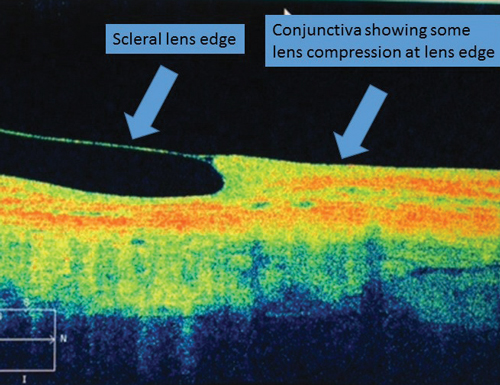 | |
| Fig. 2. OCT measurement of edge. | |
 | |
 | |
| Fig. 3. OCT image of hybrid contact lens on-eye fitting characteristics. Photo: Jeffrey Sonsino, OD |
Case #1
A 28-year-old female was refit into scleral lenses due to her high -10.00D OU Rx. She was fit in a design for conventionally shaped corneas and had been wearing the scleral lenses successfully for about two weeks. She stated that insertion and removal were becoming easier each day and that comfort and wear time were excellent. However, she noted appearance of a strange glare in her right eye only and reported that her vision wasn’t as sharp in the right eye as it was in the left eye.
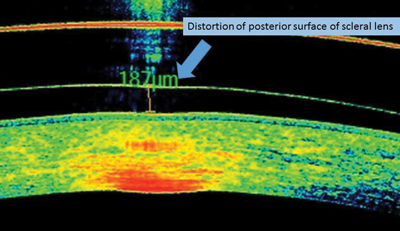
Visual acuity was 20/30 OD and 20/20 OS. There was no significant spherocylinder over-refraction. Lens fit in both eyes was good: the central and limbal clearance of both lenses appeared appropriate, as well as the lens edge. Both lens surfaces appeared to be wetting well with no deposits or scratches. Upon OCT evaluation, the posterior surface of the right lens appeared slightly distorted, and it was determined the lens was defective: the lathe had not properly cut the posterior lens surface, leading to an uneven surface. This was causing the patient symptoms of poor vision and glare (Figure 4). The laboratory refabricated the OD lens and, upon dispensing, the patient reported 20/20 vision and no glare.
Case #2
A 40-year-old white female was fit into scleral lenses for treatment of dry eye disease. She had been wearing the lenses successfully for about one month, but complained of decreased wear time, stinging upon removal and increasing eye redness throughout the day. She also noticed a compression ring upon removal. While wearing the lenses, she could see 20/20 OD and 20/20 OS. There was no significant spherocylinder overrefraction.
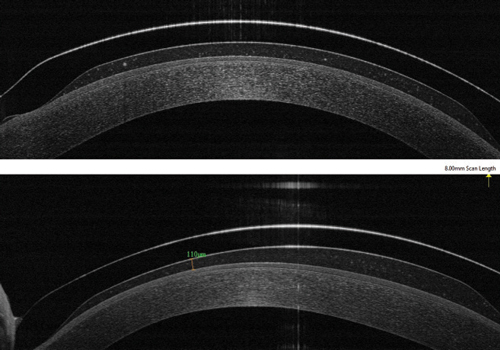
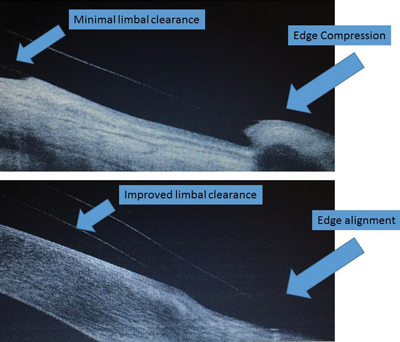
Slit lamp evaluation showed central clearance of about 200µm in each eye, but limbal clearance was difficult to assess. The edges did show some blanching at 360 degrees. Evaluation of the edges with the OCT showed minimal limbal clearance and poor edge alignment.
With lenses removed, there was limbal staining OU, indicating inadequate clearance. To remedy the poor lens fit, the limbal vault was increased and the edge design was flattened slightly to help with the limbal staining and edge compression, respectively (Figure 5). She has now worn the lenses successfully for six months with no corneal staining or edge compression.
As optometrists, we typically think of OCT imaging for the posterior segment, but we should also remember there are some excellent anterior segment applications. OCT imaging definitely helped me become more confident with fitting scleral contact lenses when I was first learning about this special lens design. Keep in mind that you do not need an OCT to successfully fit scleral lenses, but if you do have this device on hand, the information it can give you can be very valuable for your scleral lens fittings.
 |  |
| ||
| Fig. 4. Distortion of posterior lens surface. | Fig. 5. OCT before (top) and after (bottom) lens modifications. |