Scleral lenses are large-diameter gas permeables that offer a wide range of parameters for patients with corneal irregularity from ectasia, post-surgical misadventure and trauma and ocular surface disease. The process of fitting scleral lenses may seem daunting at first; however, if a stepwise approach is followed, excellent success can be achieved with initial fits or refits. Here are some important considerations to keep in mind for achieving a successful fit and maximizing patient comfort and experience.
Understanding Corneal Topography
Scleral lenses are fit based on sagittal height, not base curve. First, locate the steepest point of the cornea, as the goal of the fitting is to vault over the cornea without causing corneal bearing. Data from topography can help determine if the corneal shape is prolate, oblate or asymmetric.
For patients with an ectatic corneal pathology, starting with a prolate lens can help achieve clearance over the central cornea. However, for patients with post-surgical eyes, pellucid marginal degeneration or peripheral elevations such as Salzmann’s, using an oblate design from the fitting set will help achieve sufficient midperipheral clearance.
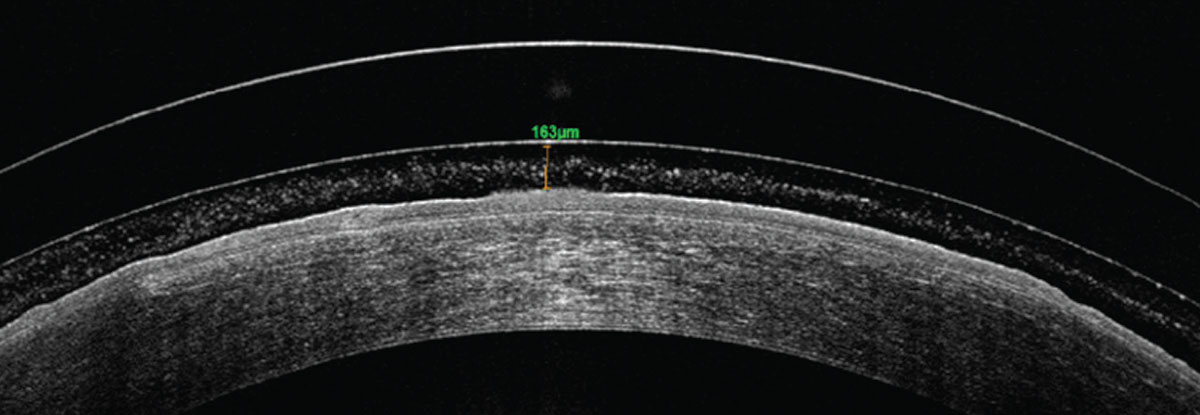
Once the appropriate trial lens design is selected and applied on the patient’s eye, wait 20 to 30 minutes before assessing the lens fit. While the lens may look like a good fit upon initial application, the fit might change as the lens sinks into the conjunctival tissue during the settling process and reduces the clearance, the ideal amount of which is 150µm to 175µm after lens settling. Allowing for lens settling before evaluation provides useful information to guide further lens modification.
Also, after the first lens dispense visit, having patients return with at least four hours of wear on the day of the follow-up helps with lens evaluation, decreases chair time and reduces the number of modifications.1
It is important to closely monitor patients with significant ocular disease, especially endothelial disease. If the endothelial count goes below 800cells/mm2, there is a greater risk of corneal edema secondary to endothelial dysfunction. Having a patient wear their lenses for four to five hours before evaluating for any sign of rainbow or glare during lens wear can provide a good indication of candidacy for scleral lenses. Choosing a hyper-Dk material, maintaining a reduced vault and reducing lens center thickness to maximize oxygen flux to the corneal tissue can aid in this process.2
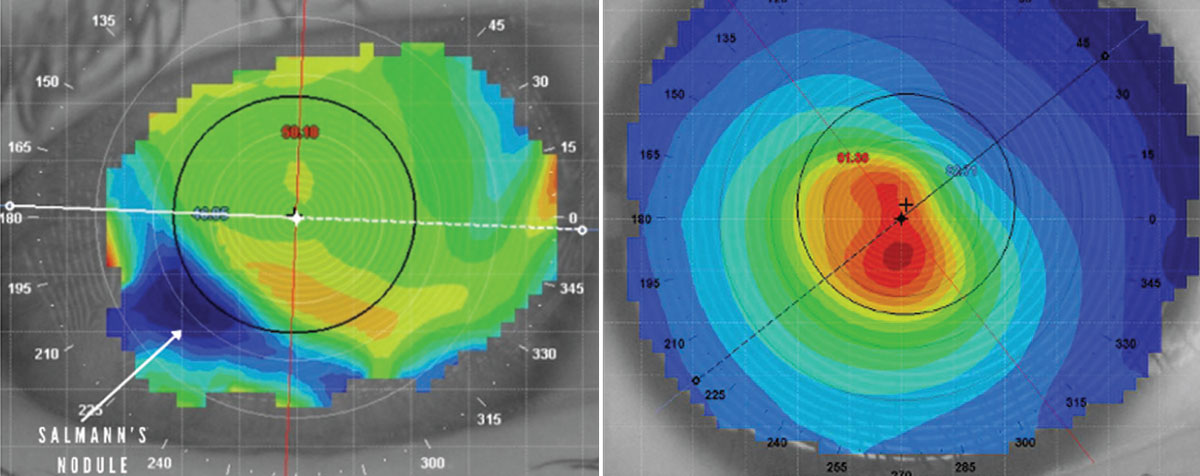 |
This patient has a midperipheral Salzmann’s nodule, as indicated by the white arrow (left). Central corneal steepening is a classic sign of keratoconus (right). Click image to enlarge. |
Selecting Diameter
Diameter is a key parameter in scleral lens selection. The majority of fitting sets come with standard diameters; however, making modifications to the diameter can only help maximize the range of parameters for your patient-specific scleral anatomy. Generally, starting with a lens diameter 5mm to 6mm larger than the horizontal visible iris diameter allows the lens to rest 2mm to 3mm past the limbus and offers smoother bearing.
The scleral lens landing area varies with the diameter and, with appropriate selection, it can help alleviate concerns of scleral lens compression, aid in achieving sufficient vault over asymmetric corneal surfaces, rehabilitate ocular surface disease and provide clearance from conjunctival lumps and bumps. For example, when working with patients with highly ectatic or asymmetric grafts in the midperiphery, it can be a challenge to clear the peripheral corneal elevations. Increasing vault in a small-diameter lens can help; however, this often adds more pressure on the haptic with issues of scleral compression. In such cases, a large-diameter lens can help achieve a sufficient vault to clear the peripheral cornea and allow for an even weight distribution at the landing zone.
Conjunctival lumps and bumps, such as blebs, pingueculae and pterygia, can also pose a challenge to diameter selection. During the fitting process, if the lens edge abuts the pinguecula or bleb, reducing the diameter of the lens can help reduce irritation, hypertrophy and hyperemia. Notching and/or peripheral vaults can also help avoid constant friction over these areas of conjunctival elevation. However, if you are considering adding a notch or a microvault at the periphery, first ensure lens rotational stability and haptic alignment before ordering modifications. If the lens haptics are not aligned and the lens is unstable, then the notch or microvault may not land at the intended location.
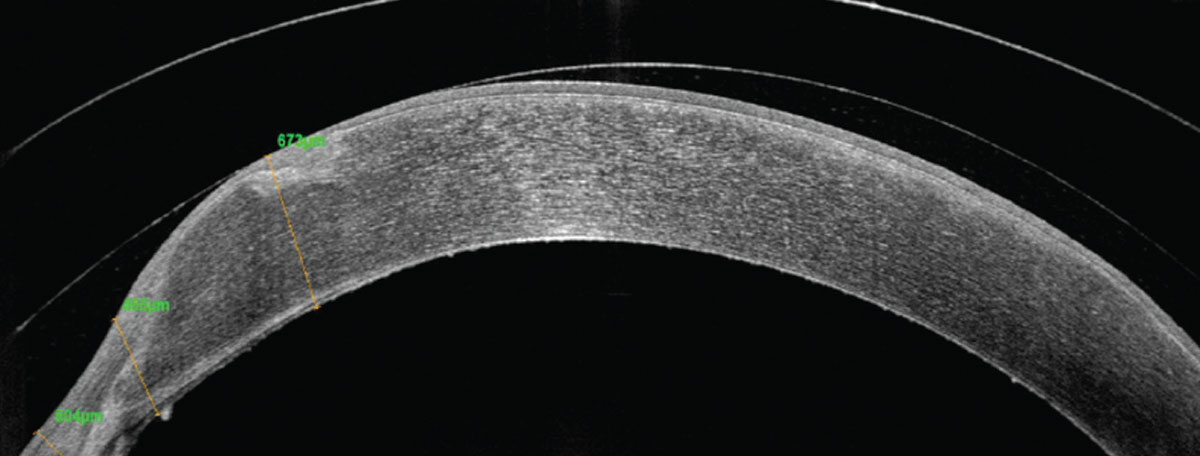 |
A highly prolate penetrating keratoplasty graft with nasal elevation in a small-diameter scleral lens. Click image to enlarge. |
Managing Scleral Toricity
With advances in corneoscleral mapping, there is strong evidence that suggests the sclera is non-rotationally symmetrical, with increasing asymmetry past the corneal apex. The nasal area of the sclera is the flattest due to the proximal insertion of the medial rectus muscle in comparison with the lateral rectus muscle at the temporal portion. A toric or quadrant-specific haptic can help achieve a better scleral alignment, as it provides an even bearing across the scleral surface. Some of the common problems noted with a poor haptic alignment are blanching or fogging in the tear reservoir.1,3,4
Blanching occurs when there is localized pressure from the scleral landing zone that reduces conjunctival blood flow. Adding toricity to the lens haptic can help with even weight distribution at the landing zone and reduce compression of the conjunctival blood vessels. Blanching can occur at the lens edge and requires flattening the scleral landing zone. However, if compression takes place under the scleral lens landing zone and closer to the limbus, it indicates a heel effect in which the scleral lens lands too harshly on the conjunctiva, resulting in tissue irritation and hyperemia. In such cases, steepening the landing zone relieves compression and creates a smoother landing.
In addition, midday fogging or air bubbles trapped under the lens can arise from scleral edge lift off. Applying fluorescein after lens application can help assess lens edge lift off. If fluorescein seepage occurs in one of the meridians of the haptic after dye instillation, the lens is most likely flexing with each blink and pumping debris in the tear reservoir, resulting in midday fogging or bubble formation. Steepening the lens edge for better scleral alignment can help reduce patient symptoms and prevent aggravated papillary reaction.
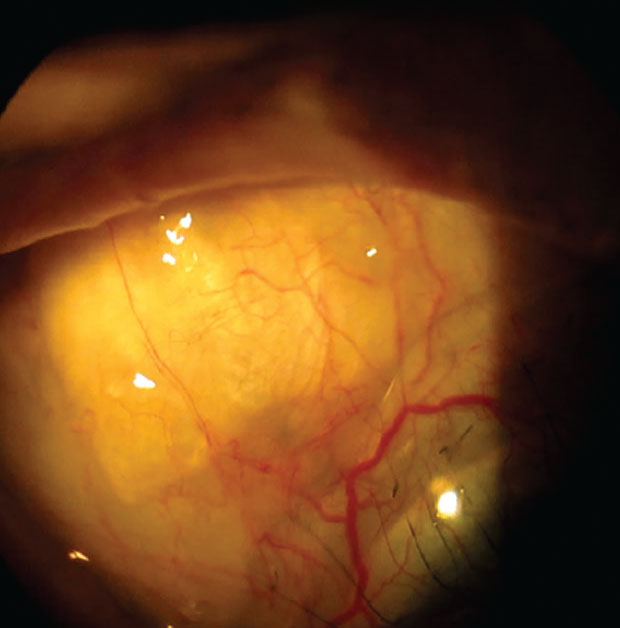 |
A notch in the scleral lens periphery helps avoid touch with the superior nasal bleb. Click image to enlarge. |
Measuring Over-refraction
Once a trial lens with an adequate central clearance and haptic has been selected, the next step is to perform an over-refraction to improve the patient’s visual outcome. Starting with an autorefraction over the lens can provide a good starting point for manifest over-refraction. A good spherocylindrical over-refraction is often useful to assess the best visual potential for the patient and rule out concerns with flexure and other causes of residual astigmatism.
There are two causes of residual astigmatism with rigid gas permeable lenses: lenticular cylinder and flexure. One way to identify the root cause is by performing topography over the scleral lens. If astigmatism is detected over the lens, flexure is the culprit. However, in a well-fitted lens, if there is no astigmatism noted on topography over the lens, then the cause of residual astigmatism is true lenticular cylinder. In this case, front surface toricity can help correct the refractive issue. In cases where the lens has no haptic toricity and cylindrical power is needed to improve visual outcomes, using a double slab-off ballasting design can help stabilize the front surface toric lens on the eye surface.
Routinely, we can correct for lower-order aberrations such as spherocylindrical refractive error, and defocus can be corrected with traditional glasses and contact lenses. However, patients with keratoconus have significant amounts of higher-order aberrations such as coma and trefoil. Scleral rigid gas permeable lenses provide a stable surface to correct for irregularities on the front surface of the cornea. Another recent technological advancement is wavefront-guided scleral lens correction that allows for superior control of aberrations.
 |
| Blanching at the lens edge (left) and fluorescein seepage superiorly in a scleral lens due to edge lift off (right). Click image to enlarge. |
Minimizing Flexure
Flexure not only happens with corneal gas permeable lenses but also with sclerals. It can reduce visual acuity and result in ghosting of images. As discussed above, performing keratometry or topography over the scleral lens can help confirm flexure.
In situations of flexure, start by assessing the peripheral landing zone alignment. If the scleral lens landing zone does not correlate to the scleral toricity, the lens will bend, potentially resulting in residual astigmatism. However, if residual astigmatism is still present after a good scleral peripheral alignment and lens centration are achieved, the next step is to increase the center thickness of the lens with caution. Altering lens thickness helps; however, it also reduces oxygen transmissibility to the cornea, which must be taken into consideration.5,6
Lastly, front toricity is another option. However, it is important to ensure that the lens is rotationally stable before adding front surface toricity. If the lens is rotationally unstable, the additional refractive power may not land at the appropriate meridian and may exacerbate the ghosting. Once the haptic is finalized and the stability of the lens is established, front toricity can be added to the lens.5,6
 |
|
Fogging in the tear reservoir due to improper scleral lens haptic alignment.Click image to enlarge. |
Customizing Wetting Angle and Lens Coating
One of the issues that can be challenging during a new lens fitting or a refit is poor wettability of the front surface of the lens, especially in patients with ocular surface disease. It causes anterior lens surface fogging and deposits and can reduce the quality of vision and visual performance for patients.
Wetting angle is an important factor in the selection of scleral lens material. This refers to the ability of a fluid to spread across the lens surface. Normally, a low wetting angle helps with an even distribution of fluid over the lens surface. Managing anterior surface fogging requires a multistep approach of ocular surface treatment and appropriate lens material and lens coating selection. Material with sufficient Dk and a low wetting angle can help in improving anterior surface wetting concerns and lens optics. However, in cases where high Dk lenses, such as Boston XO and Boston XO2, are required for compromised corneas, adding hydrophilic coating such as Hydra-PEG (Tangible Science) can alleviate fogging concerns.7,8
Takeaways
As challenging of a task as scleral lens trial fitting (let alone successful fitting) seems, we must start somewhere. There are plenty of considerations to keep in mind as you work through the process; luckily, there are also many helpful resources at your disposal, including the suggestions provided in this article.
Dr. Bedi completed a residency in cornea and contact lenses at the Southern California College of Optometry at Marshall B. Ketchum University after graduating from the Illinois College of Optometry. She focused on specialty contact lens fitting for corneal pathologies, aphakia and prosthetics. She is a fellow of both the Scleral Lens Society and the American Academy of Optometry.
1. van der Worp E. A Guide to Scleral Lens Fitting, 2nd ed. Forest Grove, OR: Pacific University; 2010. 2. Johns LK. Scleral lens 601: advanced applications. Contact Lens Spectrum. 2016;31:38-30. 3. DeNaeyer GW. Scleral shape and its application for scleral lens fitting. Contact Lens Spectrum. 2020;35:32-34,36,37,51. 4. Morrison S, DeNaeyer G. Shaping the future of scleral lenses. Contact Lens Spectrum. 2017;32:28-30,32,33. 5. Shovlin JP. Fighting flexure. Rev Optom. 2020;157(2):88. 6. Shovlin JP. Getting back in shape. Rev Optom. 2016;153(8):66. 7. Siergey JL. Troubleshooting nonwetting scleral lenses. Collaborative Eye. July 27, 2018. collaborativeeye.com/articles/mar-apr-18/troubleshooting-nonwetting-scleral-lenses/. Accessed August 18, 2021. 8. Manning J. Making sense of scleral lens materials. RCCL. 2018;155(6):24-7. |