As the scope of practice expands throughout the country, optometrists stay up-to-date by attending conventions and completing continuing education classes. The thought of implementing the latest optometric trends into your practice may motivate you in a grand lecture hall; however, upon returning to the scheduled routine of daily life in practice, your inspiration and motivation often dwindles away.
This does not need to be the case when it comes to fitting scleral lenses. You likely already have the knowledge and equipment needed to get started. Just look around. If you have a slit lamp, sterile saline and fluorescein, then you are ready to begin!
 |
| Sclerals can provide even your most challenging patients the comfort and vision they deserve. |
Where to Start
Now that you have made the commitment to offer this technology, you need to think about the kinds of patients you want to fit. Are you looking to fit diseased or healthy corneas? Do you want to offer multifocal lenses to your patients? It makes sense to start simple and move to more advanced cases as you become more confident. A good first fit would be a single vision lens on top of a normal or mildly ectatic cornea. Another good early patient is someone who can achieve good vision in a corneal lens but is not happy with their comfort.
Although there are several manufacturers of scleral lenses, you don’t need to start off with multiple fitting sets. These products can be researched online, and their fitting guides are often downloadable. Many companies also offer education and certification courses on their websites to get you familiar with their products. Do a little research to find a product and manufacturer that will fit well into your practice.
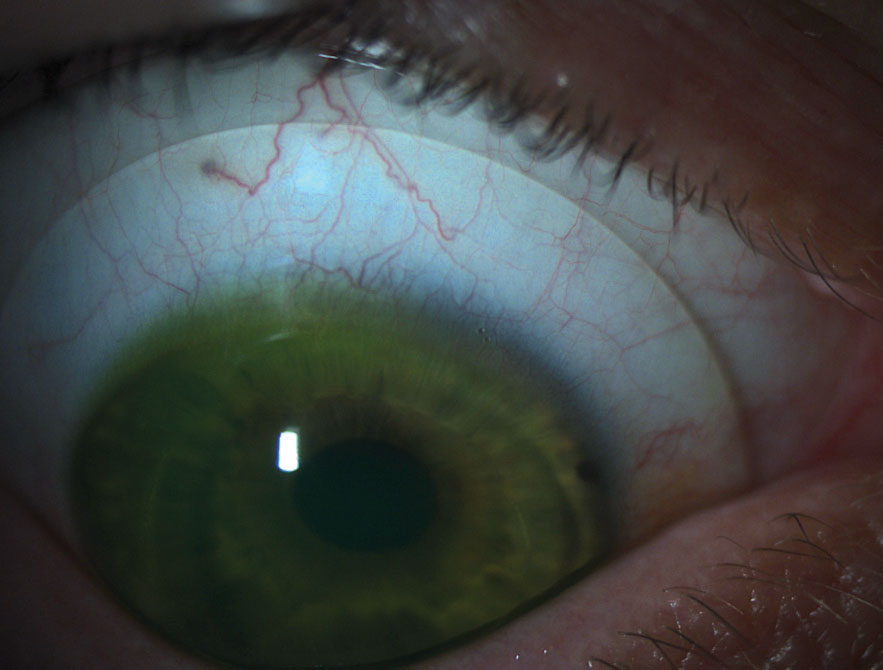
 |
| When a lens is inserted improperly, air bubbles that inhibit vision and make fitting assessment difficult appear. |
Prep the Office
The insertion and removal techniques for scleral lenses are vastly different than those for soft lenses. Most soft lens wearers can insert their lenses while standing in front of their bathroom mirror; however, scleral lens insertion requires the patient to have their head parallel to the floor with their chin tucked to their chest. Technicians also need to get comfortable working with patients in this position.
There are a few extra items that are beneficial to have in the office before you get started. Use sterile, preservative-free solution to fill the bowl prior to insertion. Lacripure (Menicon) and ScleralFil (Bausch + Lomb) are FDA approved for scleral lenses. PuriLens Plus (PuriLens) and NaCl 0.9% are off-label but safe to use. These products can be hard to find at local retailers, so be sure to have an online option available to your patients if you are not selling them in your office.
Acquire scleral lens inserters and removers as well. It can be helpful to cut the bottom off the large inserter to make sure that it does not adhere to the lens. During the fitting, you can add fluorescein to the bowl, which can get a bit messy. A patient will appreciate an apron to protect their clothing. It is also handy to have a pen light with a blue filter to look for air bubbles immediately after insertion. Avoiding these problems will keep you from having to bring the patient back to the slit lamp after inserting each lens. Once you are ready to look at the lens in the slit lamp, use a Wratten filter to assess the fluorescein more efficiently.
A well-trained staff can make all the difference in the world, so take the time at an office meeting to review with them these new lenses and how they are different from the others used in your practice. Valuable information, along with handouts and training videos are available online at www.sclerallens.org.
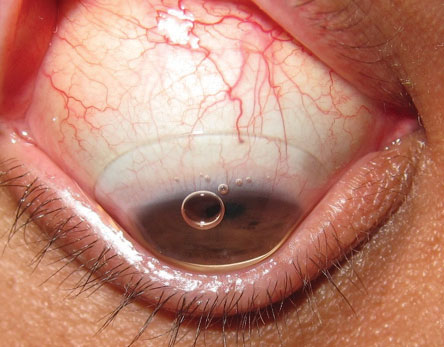
 |
| The larger, orange DMV inserter is for scleral lens insertion, and the smaller, white one is for removal. |
In-Office Tech
While a large obstacle to adding services to a practice is their startup cost, this is not quite true for introducing scleral lenses. If you are already fitting soft contact lenses, there is a good chance that you have a topographer or at least an auto-keratometer/refractor. Topographers help identify lens candidates by showing distorted corneas. Keratometers can aid in lens selection and help you evaluate potential lens flexure.
If you are tech savvy and like to make use of all your resources, your optical coherence topographer (OCT) can be a great tool for fitting scleral lenses. The pachymetry map measures corneal thickness and is helpful when evaluating for keratoconus. Measure corneal thickness before specialty contact lens wear and within six months after wear to rule out any edema caused by the contact lens. Also, take note of the lens’s relationship to the cornea and the sclera. Precisely measuring how much clearance you have is important, as the clearance can impact you patient’s visual outcome and ocular health.
Measure the exact sagittal (sag) height for each eye you are fitting to get a better idea of the necessary vault height and match an initial fitting lens.1 You can also use rotating Schieimpflug cameras, such as the Pentacam (Oculus) to obtain a pachymetry map, anterior and posterior elevation maps and the familiar axial/sagittal curvature topographical map.2 Some devices even allow you to export information to a third-party software application to help you better customize lenses for your patients.3
An anterior segment camera can also be helpful in the fitting process. You can send photos of the lens to consultants who will assist in making the proper modifications to best suit your patients. However, you don’t need to spend a small fortune on a digital camera and software for your slit lamp. Your smart phone can be mounted to any slit lamp with an adapter that starts at around $15. Then you can just text the images to your lab.
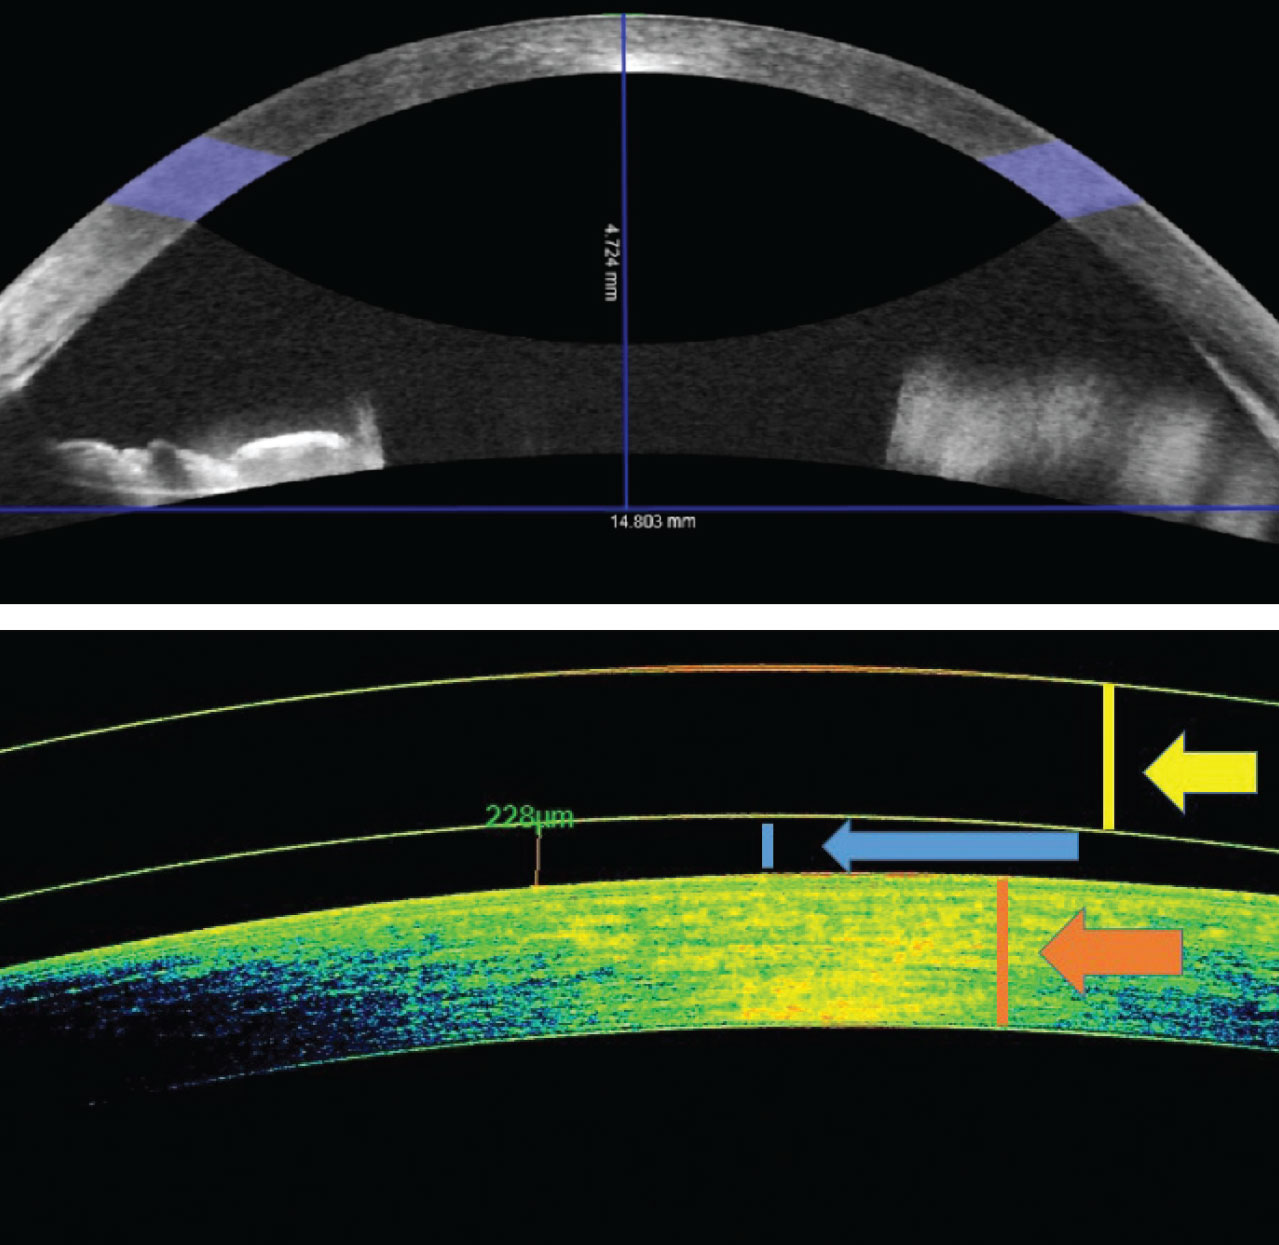 |
| OCT of the anterior chamber can measure sagittal height as well as lens clearance—a beneficial tool for fittings. Click image to enlarge. |
Patient and Initial Lens Selection
Once you identify a patient who would benefit from a scleral lens, educate them on what to expect during the fitting. They should expect to make several visits to your office for fitting, dispensing and follow-ups. Unlike soft lenses, trials are not available.
Next, you need to decide on the lens and parameters for the fit. Start by choosing the diameter of the lens. To do this, measure your patient’s horizontal visible iris diameter (HVID). This can be done with an OCT, a tomographer, a millimeter ruler or just by observation. If the patient has a big eye, use the larger diameter in your set. Most fitting guides will tell you what lens to use first based on the patient’s corneal condition and/or keratometry.
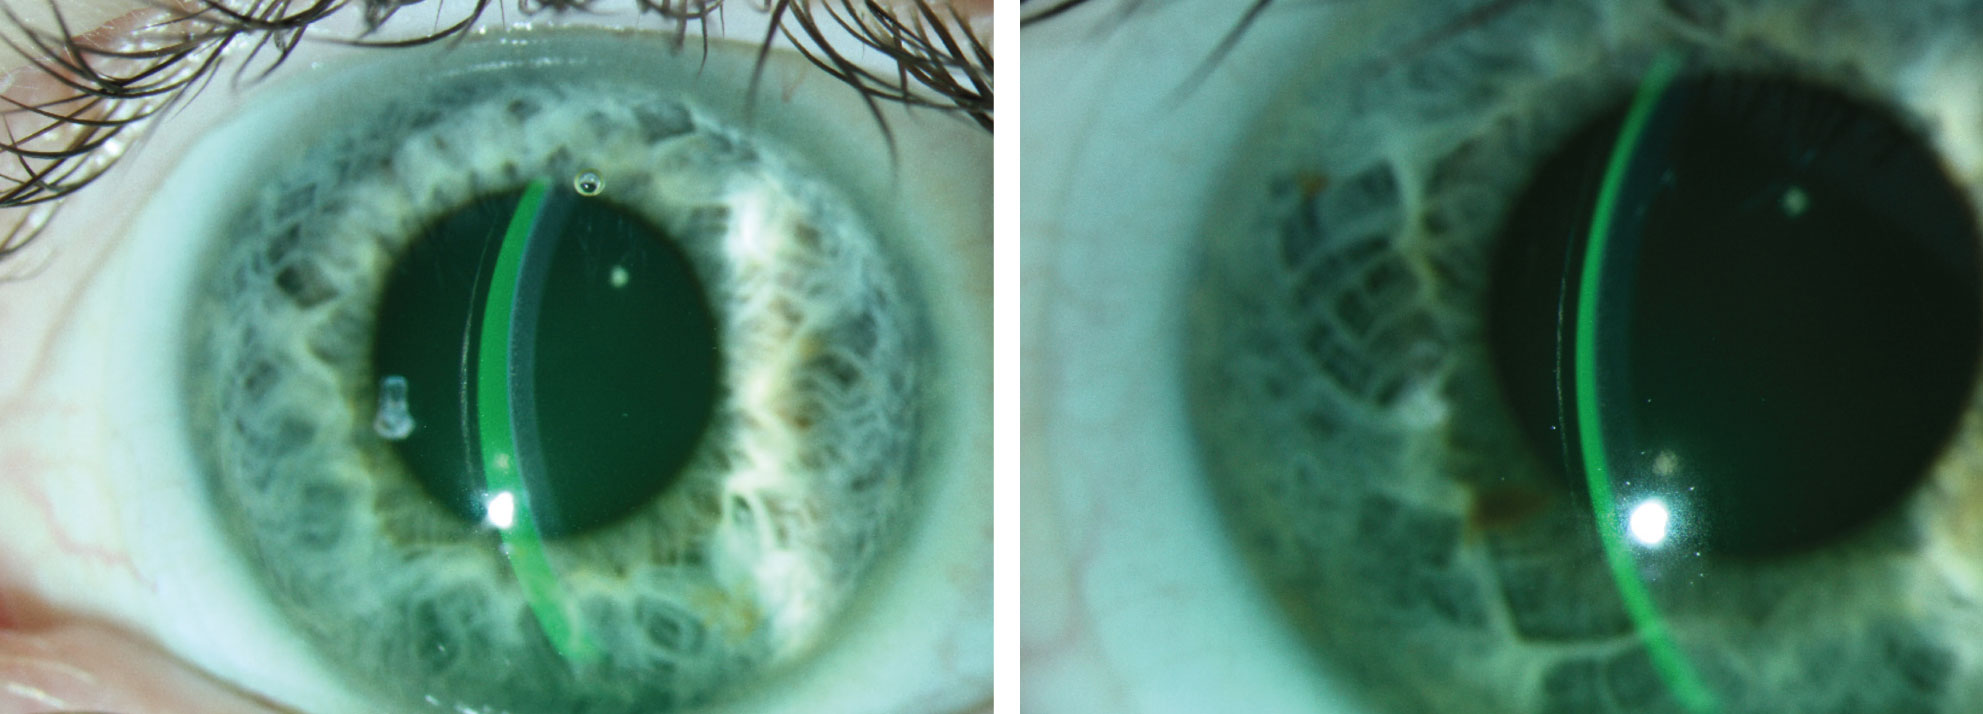 |
| At right, the tear film and lens thickness are almost equal. The lens on the left shows excessive clearance, which could lead to decreased vision, post-lens debris and conjunctival impingement. Click image to enlarge. |
Observe the Fit
Sagittal height—the depth of the lens—is a key component to any scleral fit. Normal corneas can usually be fit with a shallower sag height, whereas abnormal corneas need a deeper sag height to ensure that the lens does not come in contact with the cornea.
Select your first trial lens and fill it with a sterile saline solution. Dab a strip of fluorescein in the bowl and insert the lens on the eye. After the lens is on the eye, check for air bubbles. Bubbles appear when the lens is not inserted properly; they can inhibit vision and make it difficult to assess how the lens is fitting. If an air bubble is present, remove and re-insert the lens before further evaluation.
After the lens has settled for approximately 20 minutes, it is time to evaluate it. Start your observations centrally and move to the periphery of the lens. First, judge how well the lens is vaulting the central cornea. In cases of keratoconus, you need to ensure the lens is vaulting over the apex of the cone. Using an optic section with a blue light on the slit lamp, three distinct features should be visible: the lens, the tear film and the cornea.
Evaluate the fluorescein to make sure there is no corneal bearing; if there is, remove the lens and choose one with a deeper sag height. Compare the thickness of the lens to the thickness of the tear film. Lens thickness varies by manufacturer but is usually 250µm to 350µm. Scleral lenses tend to settle by 100µm to 200µm after a few hours of wear time; therefore, you want to have enough clearance to allow for the settling while still avoiding any corneal bearing. On the other hand, too much clearance can lead to decreased vision, post-lens debris and conjunctival impingement.4 If you have an AS-OCT, you can get a more precise measurement of the clearance. This is especially helpful for your first few fits, but judging the tear film will suffice in most cases.
Next, move your beam to the mid-periphery and out towards the limbus. The thin, green tear film band will get narrower as you approach the edge of the cornea, but it should not disappear. If touch is seen in the mid-periphery or at the limbus, you need to change either the peripheral curves or lens diameter.
Now look at the edge of the lens and observe its relationship to the sclera. A smooth, tangential landing is ideal. If the edge of the lens is too steep, it will compress the conjunctiva and cause discomfort and possibly edema. When the lens is too flat, the edge lifts off the conjunctiva, and its shadow can usually be seen with the slit lamp. Flat lenses can lead to lens awareness and mid-day fogging due to debris entering the bowl.
Finally, over-refract the patient. Start with spherical lenses and add cylinder as needed. If cylinder is present, the lens may be flexing. Perform topography over the lenses to confirm this.5 Minimize lens flexure by increasing the center thickness of the lens or by adjusting the peripheral curves. If the astigmatism is lenticular in nature, a front-surface toric design should correct it.
Now, you are ready to order the lenses for your patient. Once they arrive, be sure to you give your patient, your staff and yourself plenty of time to go over lens care, as well as insertion and removal training. Have a starter kit with lens cleaner, bowl filler and inserter and removal tools
readily available.
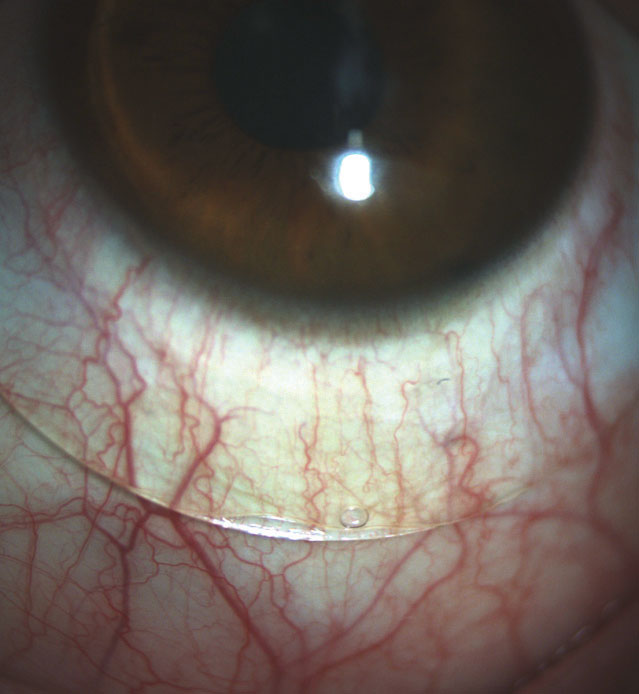 |
| A scleral lens should sit smoothly and not display compression or edge lift, as seen here. |
After a successful training session, bring your patient back in one to two weeks for follow-up. A late morning or afternoon appointment is ideal, since you want to observe the lens after it has been on the eye for at least four hours. Just like at the initial visit, start your evaluation centrally and make your way to the edge of the lens. How much clearance do you have? Is there any bearing on the mid-periphery or limbal regions? Are the edges of the lens sitting smoothly on the sclera without excessive compression or edge lift? Is the corneal epithelium intact?
Sometimes, Snellen acuity doesn’t improve as much as we hope for, especially in ectatic corneas. Ask the patient about their vision; even if they are not 20/20 they will often notice a reduction in glare, improvement in contrast and ultimately be “20/happy.”
Make adjustments to the power, sagittal height and peripheral curves and follow-up as indicated by your findings and patient history. If you have questions on what your next step needs to be, contact the manufacturer. Lab consultants are great resources for both the novice and advanced fitter.
Scleral lenses can provide excellent vision and comfort to your patients. Fitting them does not require a large investment, but the results of putting in the effort will pay dividends to your practice and your patients for years to come.
Dr. Sterling practices at the Greenville VA Health Care Center in Greenville, NC, and is the trustee of administrative affairs for the North Carolina Optometric Society. He is a fellow of both the American Academy of Optometry and the Scleral Lens Education Society.
1. Caroline PJ, André MP. OCT aids in contact lens fitting. CL Spectrum. 2015;30(2):56. 2. American Academy of Ophthalmology. Imaging the anterior segment: scheimpflug analysis. Focal Points. www.aao.org/focalpointssnippetdetail.aspx?id=5b89b5e8-19d4-4e49-9edf-d791ce4497a1. Accessed July 23, 2019. 3. Oculus. Pentacam optional software modules: CSP Report. www.pentacam.com/int/ophthalmologist-diagnostic-without-pentacam/models/pentacamr/optional-software.html. Accessed July 23, 2019. 4. van der Worp E. A Guide to Scleral Lens Fitting [monograph online]. Forest Grove, OR: Pacific University; 2010. commons.pacificu.edu/mono/4. Accessed July 23, 2019. 5. Jedlicka J. Solving scleral lens complications. CL Spectrum. 2012;27:40–4, 55. |