 |
When a patient has pingueculae or pterygia, the clinician may hesitate to fit a scleral lens, opting instead for a corneal lens where the conjunctival obstacle can be avoided altogether. If a scleral lens is necessary in a patient with pinguecula, landing zone customization, such as a toric periphery or a localized vault or notch, may be required.1,2 Another strategy is to fit over the pinguecula by using a larger diameter scleral lens, thus compressing the lesion.3
Case Presentation
 |
|
Fig. 1. The right eye initial scleral lens fit before further adjustments to landing and modification were added. Click image to enlarge. |
A 47-year-old woman with a history of phlyctenular keratoconjunctivitis and bilateral corneal scarring presented wearing scleral lenses that were three years old. Her chief complaint was blurry vision at near, OS>OD, with onset several months prior. She had not tried reading glasses over her habitual X-Cel Atlantis 15.0mm scleral lenses OU. She reported good comfort overall with the lenses and used the prescribed solutions: Clear Care (Alcon) for cleaning and disinfecting, and 0.9% preservative-free saline vials to fill the bowl of the lens prior to application. After lens removal, she often used artificial tears to improve comfort and dryness symptoms.
Her entering distance visual acuity (VA) with the habitual lenses was 20/20 OD and 20/20-3 OS. There was no over-refraction over her scleral lenses. Adequate central tear reservoir clearance was noted along with the expected transitional zone (limbal) clearance and impingement in each eye at the nasal and temporal edge landings. Her manifest refraction results were OD -6.25 -3.75x034 VA 20/20 and OS -7.00 -2.00x143 VA 20/30. Her simulated keratometry values from topography were OD 45.91/47.83@109 and OS 45.66/47.73@062.
Entrance testing was within normal limits. Slit lamp evaluation revealed temporal scarring in each eye and nasal scarring OS only. There was mild vessel encroachment OD, OS. An elevated pinguecula was present nasally and temporally OU, with the nasal area more advanced in each eye. The dilated fundus evaluation was within normal limits OD, OS.
 |
|
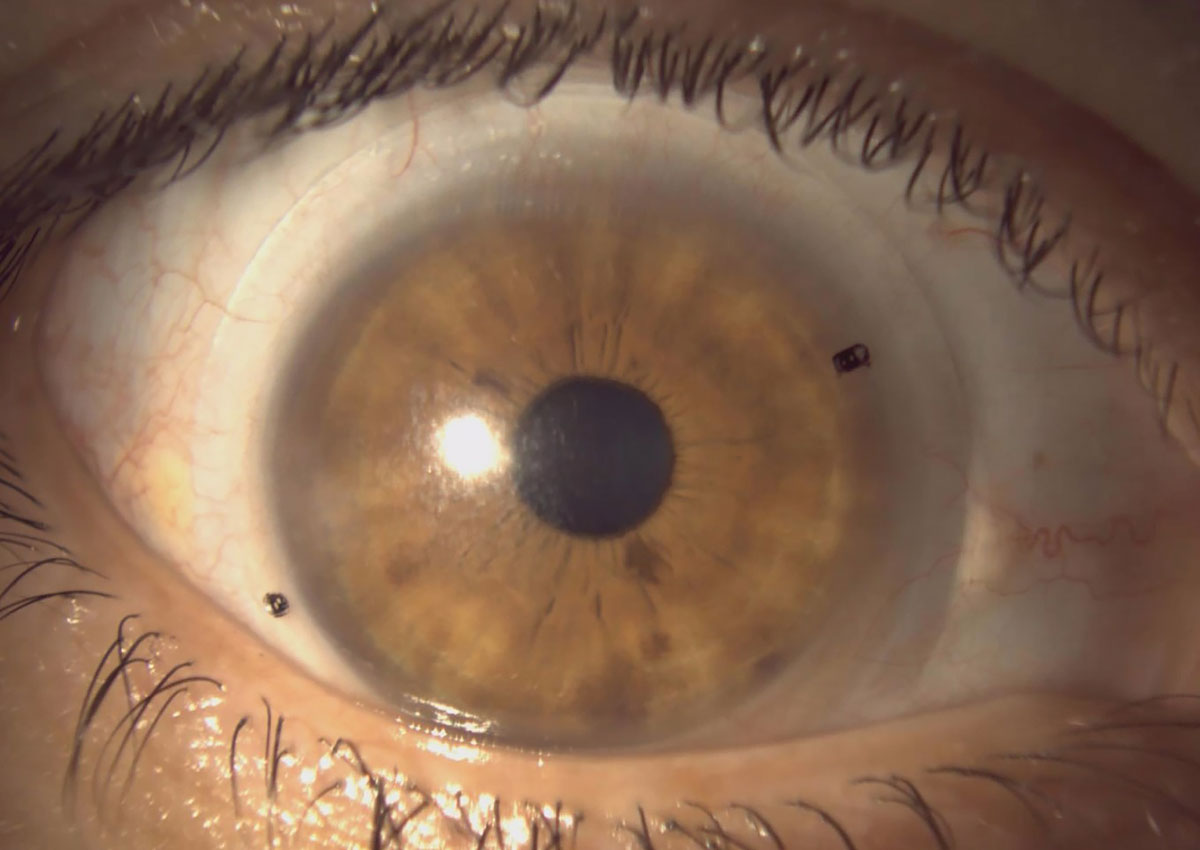
Fig. 2. Left eye with initial lens removed to reveal lissamine green staining at area of conjunctival hypertrophy adjacent to nasal pinguecula. Click image to enlarge. |
Fit Assessment
Since the patient was a previous scleral lens wearer fit in our clinic, we elected to modify the habitual lenses to fit the eye and elevated pinguecula present better (Figure 1). The landing zones were flattened OU for a new initial pair of lenses.
After wearing the new pair for two weeks, the patient followed up with symptoms of fogging, which subjectively worsened after a few days of wear. Upon slit lamp exam, the lenses wetted well, but there was evident tear reservoir debris OU with impingement at the end of the landing zone adjacent to each pinguecula. This impingement stained with lissamine green in each eye (Figure 2). New lenses were ordered with less central tear reservoir clearance OU, a steeper limbal vault and the addition of toric peripheral curves to improve the fit around each pinguecula.
Upon follow-up on these lenses, the patient noted improvement in lens fogging and comfort, but there was still evident impingement at the lens edge. The landing zone was flattened further, which improved the patient’s symptoms. She reported being fairly comfortable in the lenses and the impingement appeared improved, but there was still persistent staining after lens removal. Flattening the landing zone even further resulted in mild lens awareness, so the penultimate pair was notched. The final lens parameters were OD: 7.46/4187/-4.75/15.0 Atlantis Toric PC (std/double steep) and OS: 7.54/4102/-3.75/15.0 Atlantis Toric PC (std/double steep). Both lenses were Boston XO material with ice blue color.
Notching Process
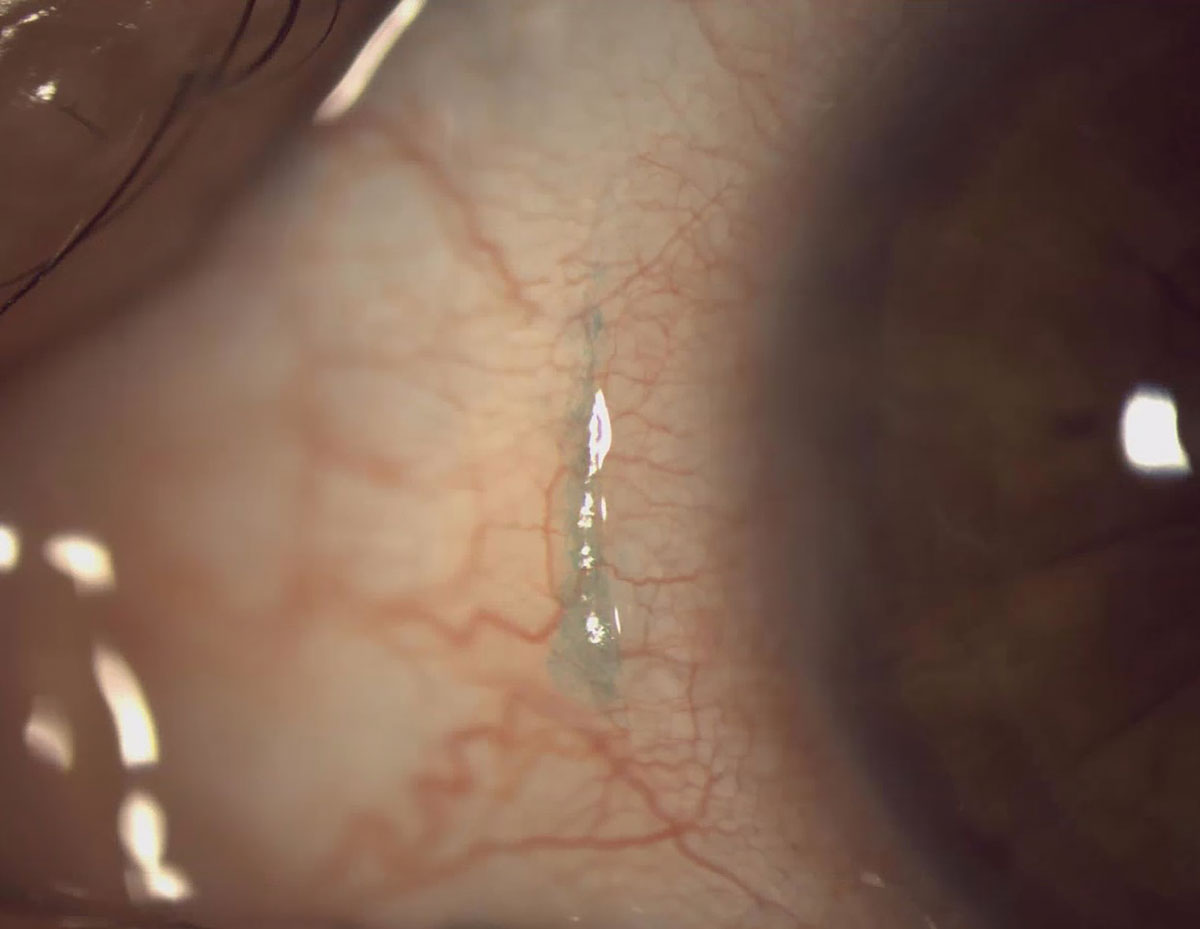
A permanent marker was used to directly indicate the region of the scleral lens that required notching while the lens was on-eye, after a period of settling.2 The notching procedure followed the style of that seen in an online educational video presented by Daddi Fadel, DOptom, and also that outlined in an article by Patel et al.4,5 Care was taken to prevent sustained contact between the lens and the rotary tool to avoid excessive heat formation and lens damage or warpage (Figure 3). The resulting notch was then polished and rinsed prior to checking the fit on-eye. The patient was advised of where the existing markings should sit for each lens when applying it to the eye to facilitate optimal placement of the notches (though, in theory, the toric peripheral curves should help align the lens as well).
 |
Fig. 3. Hand-notching the scleral lens in-office using a corded rotary tool. The area to be notched was marked on-eye prior to being removed for the modification. Click image to enlarge. |
Cautions
It is important to ensure that when hand-notching a lens, the notches are the proper size so that the scleral lens remains sealed to prevent entry of debris and/or air bubbles (Figure 4).5 The technique also has the potential to result in lens breakage or to leave rough edges behind if not properly polished. Of course, there is also the risk that the lens does break (either during notch formation or any time afterward), and then you would need to order a new lens and re-create the notch by hand again.
 |
|
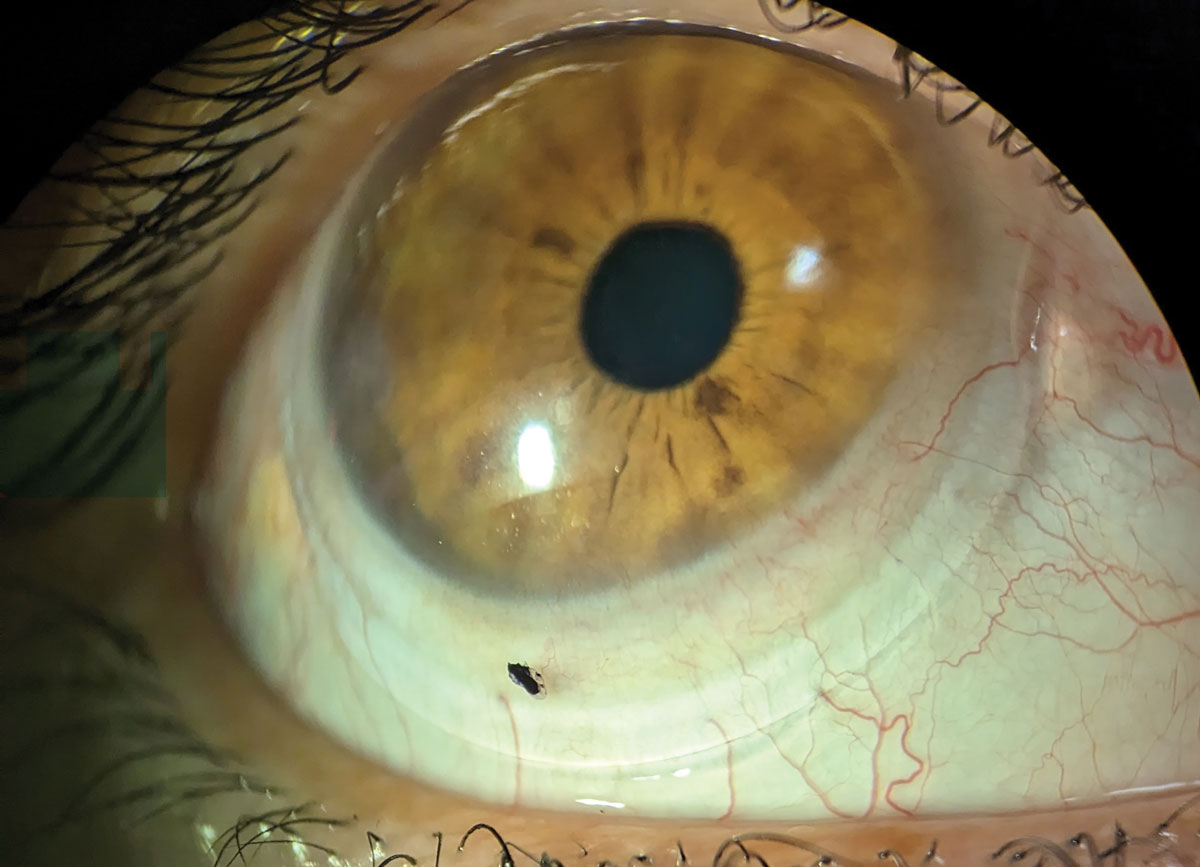
Fig. 4. Right scleral lens after completion of the notching process. Note the nasal recess allowing for less compression near the pinguecula. Click image to enlarge. |
This technique could be especially useful for patients with an existing lens that needs adjustment, or for patients who have a budget that precludes the addition of specialized notches or vaults to a new lens. Before undertaking this technique with a patient’s existing lens, I highly suggest devoting some practice time to marking and notching a few “test” lenses from those you may have otherwise discarded. This will help you get a feel for the amount of pressure needed and the way your rotary tool and accessories will behave in this use case.
Special thanks to Heather Durkee, consultant at X-Cel Specialty Contacts, for her assistance with this case.
1. Barnett M, Courey C, Fadel D, et al. BCLA CLEAR—scleral lenses. Cont Lens Anterior Eye. 2021;44(2):270-88. 2. Walker MK, Schornack MM, Vincent SJ. Anatomical and physiological considerations in scleral lens wear: conjunctiva and sclera. Cont Lens Anterior Eye. 2020;43(6):517-28. 3. Van der Worp E. A Guide to Scleral Lens Fitting, 2nd Ed. Pacific University; 2015. 4. Fadel D. How to Make a Notch in a Scleral Lens. Review of Optometric Business. Accessed January 18, 2023. www.reviewob.com/how-to-make-a-notch-in-a-scleral-lens. 5. Patel RP, Samples JS, Riaz KM. Frugal method of notch modification of scleral contact lenses in the setting of complex ocular surface anatomy. Eye Contact Lens. 2022;48(2):88-90. |