 Imagine trying to steer your car while looking through a ship’s porthole—and then suddenly one day being able to use a luxuriously large windshield instead. That’s akin to the impact that corneal topography had on contact lens fitting when it became commercially available in the 1990s.1
Topographers offer practitioners a more comprehensive evaluation of the cornea than traditional manual keratometers, which measure only about 3mm to 4mm of the central cornea, whereas topographers measure the entire corneal surface.
As such, they often reveal critical information that manual keratometers may miss. Corneal curvature in diopters or millimeters can be assessed on any portion of the cornea, a virtue that’s especially useful when designing larger diameter GP lenses.
Topographers display a number of corneal maps, which can be used to analyze various types of valuable information. Different topographers have unique functions and features, but all are extremely helpful in GP lens design and evaluation.
You do not need to be an expert on topography or spend hours learning how to manipulate the equipment or interpret the report to find success with these powerful tools. This month, I’ll discuss some easy ways to understand topography—and use it to its full potential.
Follow the Maps
The following maps can be essential in GP lens fitting:
| |
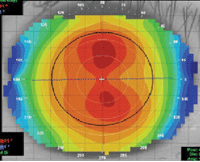
| Fig. 1. An axial map of regular astigmatism. |
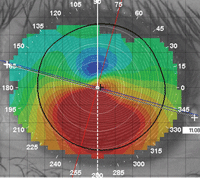
• Axial power maps are very important and very useful diagnostic tools, as they are capable of distinguishing between regular astigmatism and irregular astigmatism. If a patient presents with a high amount of astigmatism and does not reach 20/20 through best-corrected acuity, it is necessary to use topography to rule out irregular astigmatism.
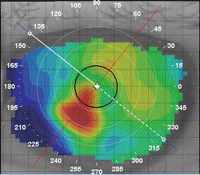
If the astigmatism has an hourglass shape with symmetry (e.g., the superior half of the cornea is almost a mirror reflection of the inferior half), you’re most likely dealing with regular astigmatism (Figure 1). Conversely, if the topography printout does not reveal symmetry, it’s reasonable to consider it irregular astigmatism (Figure 2).
The ability to map the entire surface of the cornea has given practitioners the ability to diagnose and manage corneal surface abnormalities such as keratoconus and pellucid marginal degeneration. Additionally, this technology helps us to spot many other causes of irregular astigmatism. Post-transplant and post-refractive surgery patients have also greatly benefited from this technology.
|
|
| Fig. 2. An axial map showing irregular astigmatism. |
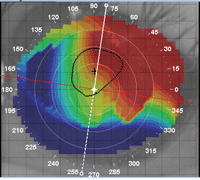
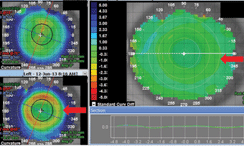
• Elevation maps are incredibly useful resources that, curiously, many practitioners do not take full advantage of. This map highlights “high” and “low” areas of the cornea. Higher areas of the cornea will appear as warm colors (e.g., red and yellow), while the lower areas appear as cooler colors (e.g., green and blue) (Figure 3).
This map is particularly useful for scleral lens design—it can determine areas where corneal touch may occur, so that the lens can be designed to vault it. Once a scleral lens has been placed on the eye, it is necessary to examine the highest area of the cornea, as shown by the elevation map—this area will likely have the thinnest amount of clearance underneath the lens and should be monitored very carefully.
| |
|
Fig. 3. Elevation maps reveal the cornea's highest and lowest points.
|
An important point to remember: the steepest point of the cornea is not always the tallest point on the cornea; I repeat, the steepest part of the cornea is not always the tallest point on the cornea! This misconception is common among practitioners. I encourage you to quickly compare the axial map and elevation map on every patient—you may be surprised by where the highest point of the cornea is on some patients.
• Tangential maps are used to define points of curvature change. This map is particularly useful for your keratoconus patients, as it will allow you to measure the exact size and shape of the cone, which can help to determine an ideal GP lens design and optic zone size.2
|
|
|
Fig. 4. Tangential maps can help to determine an ideal GP lens design.
|
For example, if topography reveals the patient has an oval cone that is decentered inferiorly, perhaps a nipple cone lens design would not be the best choice. Tangential curvature is also very helpful for corneal reshaping (i.e., orthokeratology). The tangential curve comparison map can be used to track progression of the reshaping process from visit to visit (Figure 4).
The comparison map allows you to assess the effectiveness of treatment, as it shows a dioptric power change induced in the cornea.
Other Measurements
These can be handy, too:
• Ruler. Most topography software includes a ruler feature, which measures the precise corneal diameter. This can assist practitioners in determining appropriate lens diameters in both GP designs and soft custom toric lenses as well.
Measuring the overall corneal diameter is as simple as dragging the ruler from one edge of the cornea to another (Figure 5). It is often advantageous to measure at a 45° angle since the upper and lower lids/lashes can sometimes overlap the limbus/peripheral cornea, potentially resulting in an inaccurate measurement.
| |
| Fig. 5. The ruler can measure the entire corneal diameter. |
Because it is estimated that one out of four patients fall outside the range of normal corneal diameters (11.6mm to 12.0mm), measuring corneal diameter can be very important to success of your contact lens wearers.3,5
• The sagittal height feature is especially useful when fitting scleral contact lenses. To begin, simply set the chord length to 10.0mm and find the height of the cornea. Next, take the sagittal height measurement and add 2,000.4 For example, if we used a sagittal height measurement of 1,759 and added 2,000 to it, we would have a total of 3,759. This tells us the approximate height of the cornea at a set chord length, which in this example is 3,759 microns.
For a scleral lens fitting set that uses sag or sagittal height, simply choose the first diagnostic lens closest to this measurement. For this example, that would mean selecting a lens that is close to 3.759 sag, which would likely be approximately 3.8 sag. Taking advantage of the sagittal height feature will help reduce the amount of lenses needed during a trial lens fitting.
Topographers are a great diagnostic tool for contact lens practitioners, and can help tremendously GP lens design. Spending a few extra moments with your topographer’s software can reduce chair time by selecting appropriate lenses right off the bat and help monitor patient conditions more effectively.
1. Agarwal, S, et al. Step by step corneal topography. Jaypee brothers medical publishing. New Delhi, India. 2006; 44-68.
2. Anderson, D., et al. Topography: a clinical pearl. Optometric Management. Feb 1, 2007.
3. Kojima, R., et al. Designing GPs with corneal topography. Contact Lens Spectrum. Oct 1, 2009.
4. Kojima, R. Eye shape and scleral lenses. Contact Lens Spectrum. April 1, 2013.
5. Corneal topography key to custom fitting soft lenses. Optometry Times. Oct 25, 2013.